How to safely photograph the total solar eclipse

 Jordi Busqué
Whether you have a high-powered lens or a smartphone, an astrophysicist and photographer shares how you can capture this highly anticipated event.
On 8 April 2024, a highly anticipated total solar eclipse will occur in parts of the US, Mexico and Canada, when the Moon will cover the Sun entirely, dramatically darkening the sky in a matter of seconds. Most people never get the chance to see a total solar eclipse, but when they do, they tend to find it a surreal experience.
As an astrophysicist and photographer, I always say that eclipses are the consequence of our collective voyage in space. As you read this, you're riding atop the Earth at about 107,000km/h (67,000mph) as it travels around the Sun – or roughly 30km per second (18 miles per second). The Moon moves as well, and sometimes it es right in front of the Sun, casting a shadow that es over parts of the Earth (the so-called "path of totality"), which experience a total solar eclipse.
Since it isn't safe to look directly at the Sun without specialised glasses during an eclipse, it may seem difficult or even dangerous to try and photograph this rare event. Still, both amateur smartphone shooters and more experienced photographers with DSLRs can capture images of it. Here are a few tips to ensure that this rare experience is one you will never forget.
 Jordi Busqué
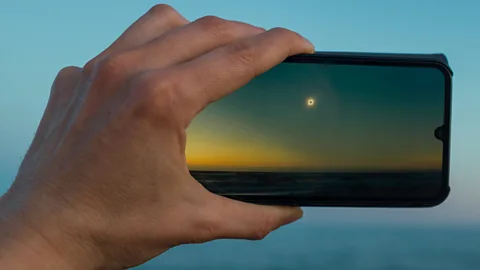
Shooting the eclipse with a smartphone
Even if you only have a smartphone, you can still get photos of the eclipse. However, you'll get the best shots during the path of totality. During these few minutes of darkness, you won't want to shoot with a filter on your phone. Instead, you'd simply use the manual setting on your phone so that the photo ends up being as dark as the scene itself. Since there won't be much light, your camera will automatically take a long exposure shot, which means you'll need to keep your phone still. If you don't have a tripod, try placing it on top of a fence or against a wall.
I'd also recommend including the landscape or the people around you to give a sense of place to the image.
 Jordi Busqué
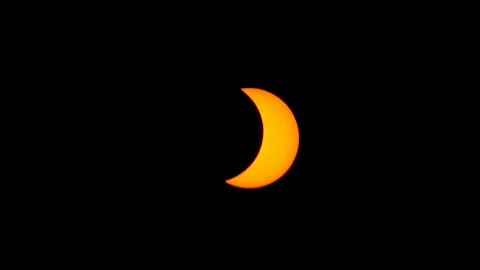
Photographing the partial phase of the eclipse with a DSLR
When the total eclipse starts, the comparatively dark disc of the Moon slowly es over the Sun, transforming it into a crescent shape. Photographing this partial eclipse phase is relatively easy since it lasts for more than an hour.
To photograph the partial eclipse, you will need a filter for the camera lens because the light will still be too strong. A popular and inexpensive solution is aluminised mylar, which is manufactured specifically for solar observation and can be cut with scissors to fit the front element of your lens. (You will have to build a cardboard frame to hold it in place and secure it with tape so it doesn't accidentally fall.)
You will likely need to operate the camera in manual focus since the autofocus may get confused by the filtered scene. The same thing is true with the exposure. I'd recommend testing this in the days before the eclipse on the regular, non-eclipsed Sun to find the settings that work best for your lens and camera combination. As a starting point, try values around 1/250s at f/8 and ISO 100.
I'd also recommend using a telephoto lens with the longest focal length you have. A mere 200mm is enough to get a decent shot of the Sun. However, with a 500mm lens, you'll be able to capture finer details such as sunspots (dark spots on the Sun's surface) like the one you see in the centre of the crescent in the above picture, which indicate areas of lower temperature.
 Jordi Busqué
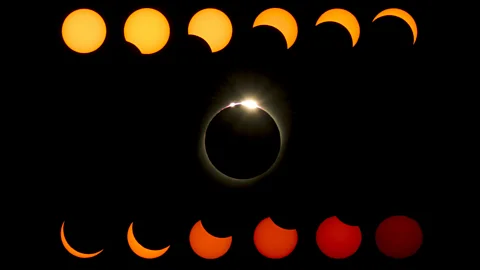
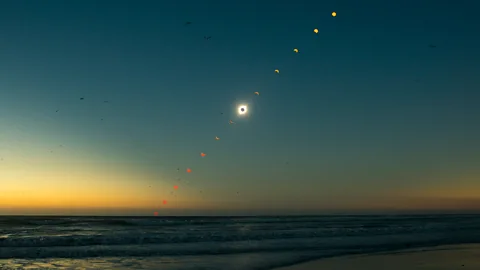
Photographing the moment of totality
The moment of totality must be photographed without any filter, otherwise the image will appear dark. This is also the only moment when you can look at the Sun without eye protection. The difficulty is that since it only lasts a few minutes, there is no time to test your shot and settings.
Filter and viewing tip
Whether you have a DSLR or a smartphone, to always shoot the partial phase with a filter and the total phase without a filter. Similarly, you always want to look at the partial phase with specialised eclipse glasses (essentially a "filter"), and you can view the total phase without glasses.
If this is your first time photographing an eclipse, I'd recommend choosing one lens and one viewpoint. A fun thing to do is to keep photographing the Sun with a telephoto lens and then make a composite image. In the above picture, notice how the Sun gets progressively dimmer because on this occasion (a total solar eclipse seen from Chile in 2019) the eclipse ended at the time the Sun was setting.
 Jordi Busqué
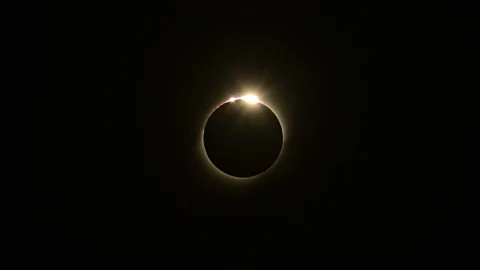
Shooting Baily's beads
In the moment immediately before and after totality, you'll be able to photograph the so-called Baily's beads, or diamond-ring effect. These are the last bits of sunlight that between the mountains on the curved edge of the Moon, causing tiny bursts of light (notice them in the top of the disc in the image above).
Put your camera on a tripod before the eclipse starts and use a remote shutter release cable to avoid shaking the camera when pressing the button. You'll need a relatively fast shutter speed – somewhere around 1/500s at f/8 and ISO 100, or even faster. Multiple beads appear and disappear in a fraction of a second, so shoot quickly when the phase of totality begins and again when it ends.
 Jordi Busqué
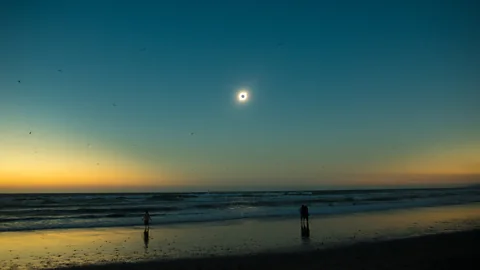
A different view of the eclipse
An alternative approach is to use a slow shutter speed instead of a fast one. This will allow you to capture the corona – the outermost region of the Sun's atmosphere – and give you a completely different view of the totality.
The above image was taken in 2019 in Chile, shooting at two full seconds at f/8 and ISO 100. The bright dot to the left of the above image is the star Regulus (the brightest in the constellation of Leo), which came out quite blurry, probably due to the shaking of the camera when the shutter opened. If you use a high-end reflex camera, use the mirror-up function to reduce shaking.
 Jordi Busqué
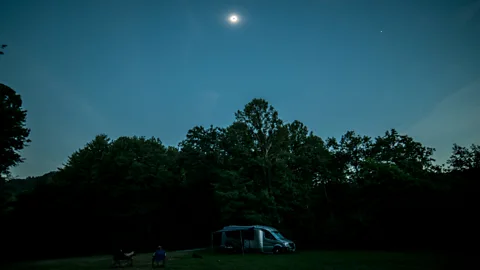
The value of a wide-angle lens
Using a wide-angle lens will allow you to include the landscape or people during the moment of totality. The Sun will appear small in the frame, but the image can be even more memorable because, unlike with telephoto lenses, you will be able to include the landscape or even people during the moment of totality.
The above photograph was taken at 1/8s f/2.8 and ISO 800 during the 2017 eclipse in North America. The Sun was very high in the sky so the shot required a 14mm lens to capture the ground and the Sun at the same time.
The April eclipse will see the Sun at a similar altitude in the southern US, so if you don't have an extreme wide angle, you'll probably need to shoot vertically to include both the eclipse and the ground. But in the northern US and Canada, the eclipse will happen later in the day and the Sun will be lower in the sky. In these locations, you'll be able to shoot horizontally with a normal wide-angle lens.
 Jordi Busqué
The Devil's Comet
On 8 April during totality, we will be able to see Jupiter to the left of the Sun and Venus to the right. Between Jupiter and the Sun, comet 12P/Pons-Brooks, also known as the Devil's Comet, will likely be visible too. That's extraordinarily unusual. It will be very hard to see it with the naked eye, but it will very likely show up in your photographs. So, compose your landscape with this in mind and look for it later when you review your images.
It's helpful to know in advance how many minutes or seconds the Sun is going to be completely blocked by the Moon in your location. If possible, try selecting a location that is as close to the centre of the path of totality as possible. San Antonio, Texas, for instance, is located right at the edge of the path and only parts of the city will enjoy totality for a few seconds. But 66 miles away in Kerrville, Texas, you'll enjoy more than four minutes of totality. There are detailed maps that allow you to check how long the phase of totality will last in your area. Also, check the weather forecast and climate pattern reports for different locations so that you maximise your chances of getting a sunny day.
 Jordi Busqué
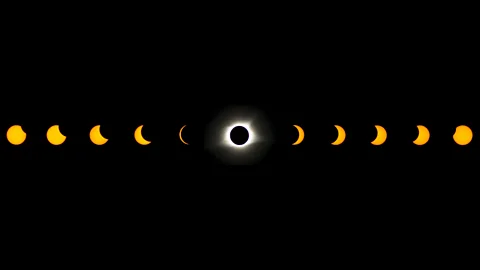
An eclipse's evolution
With a wide-angle lens, you can combine multiple images of the eclipse and capture the whole process across the landscape. To do that, set the camera in a tripod and leave it there for the duration of the eclipse. Keep photographing the scene at regular intervals. The Sun moves across the sky by its own diameter every two minutes or so, so leave more than two minutes between shots, otherwise the images will overlap.
If you shoot every 10 minutes, take the first photograph so that the totality will happen at a multiple of 10 minutes later. This way, your images will be evenly separated. Later at home, use photo editing software to add the photographs together.
BBC Travel's In Pictures is a series that highlights stunning images from around the globe.
---